If you’ve ever wanted to make a dessert that’s fun, bite-sized, and beautifully customizable, then this cake pops recipe is for you! These delightful treats combine the best parts of cake and frosting—rolled into adorable little balls and dipped in chocolate or candy coating.
Whether you’re making them for a birthday party, baby shower, holiday celebration, or just a weekend baking project, cake pops are always a hit. In this guide, you’ll learn how to make cake pops from scratch, plus tips for decoration, flavor variations, and troubleshooting common mistakes.
What Are Cake Pops?
Cake pops are small, round balls of cake mixed with frosting, placed on sticks, and dipped in a sweet coating like chocolate or candy melts. They look like lollipops—but taste like rich, moist cake bites.
Originally popularized by baker Angie Dudley (aka “Bakerella”), cake pops have become a staple at parties, bakeries, and coffee shops. The beauty of this cake pops recipe is that it’s incredibly versatile—you can use any cake flavor, frosting, or decoration you like.
Why You’ll Love This Cake Pops Recipe
✅ Perfect for parties: These mini desserts are mess-free and easy to serve.
✅ Kid-friendly: Little hands love helping with rolling and decorating.
✅ Customizable: Match colors and flavors to your event or holiday theme.
✅ Budget-friendly: Great way to use leftover cake!
Ingredients You’ll Need
Here’s everything you need to make about 24 cake pops:
For the Cake:
- 1 ½ cups all-purpose flour
- 1 ½ teaspoons baking powder
- ¼ teaspoon salt
- ½ cup unsalted butter (softened)
- ¾ cup granulated sugar
- 2 large eggs
- 2 teaspoons vanilla extract
- ½ cup milk
(Or simply use a boxed cake mix—chocolate, vanilla, or funfetti all work perfectly!)
For the Frosting:
- ¼ cup unsalted butter (softened)
- 1 cup powdered sugar
- 1–2 tablespoons milk
- ½ teaspoon vanilla extract
(You can also use store-bought frosting if you’re short on time.)
For the Coating:
- 2 cups candy melts or white/chocolate melting wafers
- 1 tablespoon coconut oil or vegetable shortening (optional, for smoother coating)
Extras:
- Lollipop sticks or cake pop sticks
- Sprinkles, crushed nuts, or mini chocolate chips for decoration
How to Make Cake Pops (Step-by-Step)
Step 1: Bake the Cake
Preheat your oven to 350°F (175°C) and grease a 9×9-inch baking pan.
In a medium bowl, whisk together flour, baking powder, and salt. In a separate large bowl, beat the butter and sugar until light and fluffy. Add the eggs and vanilla, then mix in the dry ingredients alternately with milk until smooth.
Pour the batter into the pan and bake for 25–30 minutes, or until a toothpick comes out clean.
Let the cake cool completely before moving to the next step.
Step 2: Crumble the Cake
Once cooled, break the cake into fine crumbs using your hands or a food processor. You’re aiming for a texture similar to sand—no large chunks should remain.
Step 3: Mix with Frosting
Add about 3–4 tablespoons of frosting to your cake crumbs and mix until it holds together when pressed. The mixture should be moist but not sticky.
If it feels dry, add more frosting a teaspoon at a time.
Step 4: Shape the Cake Balls
Scoop about 1 tablespoon of the mixture and roll it into a smooth ball. Repeat until all mixture is used—this should yield about 24 cake balls.
Place them on a baking sheet lined with parchment paper and refrigerate for 1–2 hours, or freeze for 20 minutes to firm them up.
Step 5: Insert the Sticks
Melt a small amount of your candy coating. Dip one end of each cake pop stick into the melted coating, then insert it halfway into a cake ball.
This helps secure the stick and prevents the cake pop from falling off later.
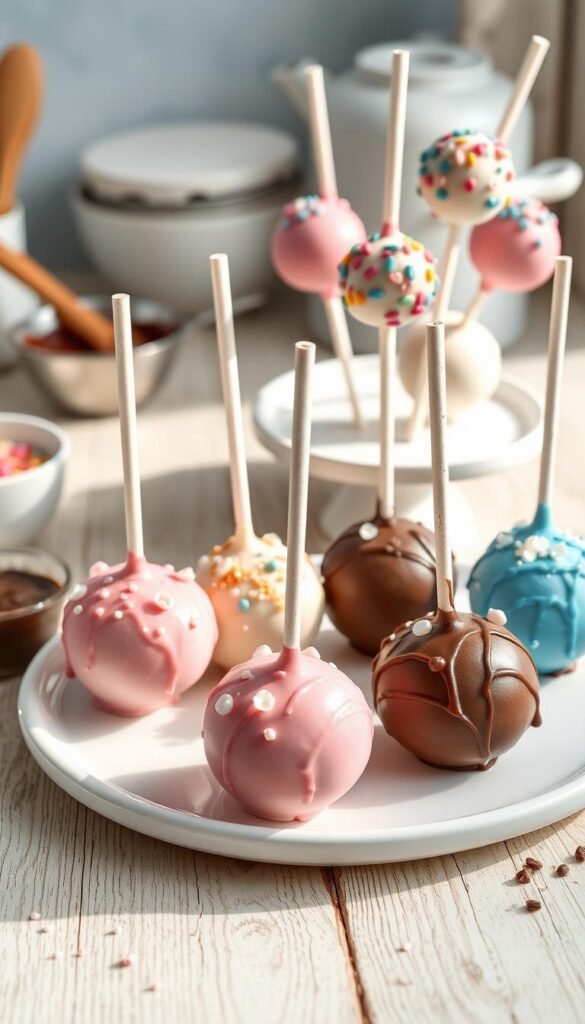
Step 6: Dip in Chocolate or Candy Coating
Melt the candy melts or chocolate in a microwave-safe bowl in 30-second intervals, stirring until smooth. If it’s too thick, add a small spoon of coconut oil.
Holding the stick, gently dip each cake pop into the coating, swirling slightly to cover completely. Let excess coating drip off, then place upright in a cake pop stand or foam block.
Step 7: Decorate and Set
While the coating is still wet, add sprinkles, crushed nuts, or drizzle with another color of melted chocolate.
Let the cake pops set at room temperature for about 30 minutes, or refrigerate to speed up the process.
Cake Pops Recipe Tips and Tricks
✨ Don’t overmix the frosting: Too much frosting makes the cake pops soggy. Start small—you can always add more.
✨ Chill before dipping: Cold cake balls hold their shape and coat better.
✨ Thin the coating if needed: Use a bit of vegetable shortening or oil for smoother dipping.
✨ Avoid cracks: If your cake pops crack after coating, the temperature difference might be too big. Let them warm slightly before dipping.
✨ Work in batches: Keep half the cake balls in the fridge while dipping the others.
Cake Pop Flavor Variations
Once you’ve mastered the basic cake pops recipe, experiment with flavors and colors!
1. Chocolate Lovers
- Chocolate cake + chocolate frosting + dark chocolate coating = ultimate indulgence.
- Decorate with mini chocolate chips or a white chocolate drizzle.
2. Funfetti Party Pops
- Vanilla cake + buttercream frosting + white candy coating.
- Add colorful sprinkles inside the cake mix for that “birthday cake” vibe.
3. Red Velvet Cake Pops
- Red velvet cake + cream cheese frosting + white chocolate coating.
- Finish with red sprinkles for a dramatic touch.
4. Lemon Bliss
- Lemon cake + lemon curd or vanilla frosting + white chocolate coating.
- Add a touch of yellow food coloring for brightness.
5. Cookies and Cream
- Chocolate cake + crushed Oreos + vanilla frosting + white coating sprinkled with Oreo crumbs.
How to Store Cake Pops
You can make your cake pops recipe ahead of time!
- At room temperature: Up to 2 days (if coated).
- In the refrigerator: Up to 1 week in an airtight container.
- In the freezer: Up to 2 months (uncoated cake balls). Thaw overnight in the fridge before coating.
Avoid storing coated cake pops in the freezer—they can crack when thawing.
Common Cake Pop Problems (and Fixes)
😫 Cake pops keep falling off the stick:
→ Chill longer before dipping, and make sure to dip the stick in melted coating before inserting.
😫 Cracks in coating:
→ The cake balls might be too cold. Let them warm up for a few minutes before dipping.
😫 Coating too thick:
→ Add ½ teaspoon of vegetable shortening or coconut oil and stir until smooth.
Creative Decoration Ideas
Want to take your cake pops to the next level? Try these fun decoration ideas:
🎃 Halloween Cake Pops: Dip in orange coating, draw pumpkin faces with black icing.
🎄 Christmas Cake Pops: Use red and green coatings, add edible glitter or crushed peppermint.
💖 Valentine’s Cake Pops: Pink or red coating with heart sprinkles.
🎂 Birthday Cake Pops: Add confetti sprinkles and colorful drizzle for a festive look.
FAQs About Cake Pops Recipe
Q: Can I use leftover cake for cake pops?
Absolutely! Leftover cake works perfectly—just crumble it and mix with frosting.
Q: Can I make cake pops without sticks?
Yes! Simply make cake truffles by skipping the sticks and placing them in mini cupcake liners.
Q: What can I use instead of candy melts?
You can use white or milk chocolate chips, just melt them with a little coconut oil for smooth coating.
Final Thoughts on the Best Cake Pops Recipe
This cake pops recipe is not only fun to make but also endlessly customizable. It’s a creative way to use leftover cake, delight kids, and impress guests with your decorating skills.
Whether you go for classic vanilla, rich chocolate, or something wild like cookies and cream, cake pops are guaranteed to bring smiles. So grab your sticks, melt your coating, and start rolling—your next batch of cake pops awaits!